
- 00 开篇词 Spring Security,为你的应用安全与职业之路保驾护航.md
- 01 顶级框架:Spring Security 是一款什么样的安全性框架?.md
- 02 用户认证:如何使用 Spring Security 构建用户认证体系?.md
- 03 认证体系:如何深入理解 Spring Security 用户认证机制?.md
- 04 密码安全:Spring Security 中包含哪些加解密技术?.md
- 05 访问授权:如何对请求的安全访问过程进行有效配置?.md
- 06 权限管理:如何剖析 Spring Security 的授权原理?.md
- 07 案例实战:使用 Spring Security 基础功能保护 Web 应用.md
- 08 管道过滤:如何基于 Spring Security 过滤器扩展安全性?.md
- 09 攻击应对:如何实现 CSRF 保护和跨域 CORS?.md
- 10 全局方法:如何确保方法级别的安全访问?.md
- 11 案例实战:使用 Spring Security 高级主题保护 Web 应用.md
- 12 开放协议:OAuth2 协议解决的是什么问题?.md
- 13 授权体系:如何构建 OAuth2 授权服务器?.md
- 14 资源保护:如何基于 OAuth2 协议配置授权过程?.md
- 15 令牌扩展:如何使用 JWT 实现定制化 Token?.md
- 16 案例实战:基于 Spring Security 和 Spring Cloud 构建微服务安全架构.md
- 17 案例实战:基于 Spring Security 和 OAuth2 实现单点登录.md
- 18 技术趋势:如何为 Spring Security 添加响应式编程特性?.md
- 19 测试驱动:如何基于 Spring Security 测试系统安全性?.md
- 20 结束语 以终为始,Spring Security 的学习总结.md
- 捐赠
16 案例实战:基于 Spring Security 和 Spring Cloud 构建微服务安全架构
通过前面课程的学习,我们已经知道 Spring Security 可以集成 OAuth2 协议并实现分布式环境下的访问授权。同时,Spring Security 也可以和 Spring Cloud 框架无缝集成,并完成对各个微服务的权限控制。
今天我们将设计一个案例系统,从零构建一个完整的微服务系统,除了演示微服务系统构建过程,还将重点展示 OAuth2 协议以及 JWT 在其中所起到的作用。
案例驱动:SpringAppointment
在本课程中,我们通过构建一个相对精简的完整系统,来展示微服务架构相关的设计理念以及各项技术组件,这个案例系统称为 SpringAppointment。
SpringAppointment 包含的业务场景比较简单,可以用来模拟就医过程中的预约处理流程。一般而言,预约流程势必会涉及三个独立的微服务,即就诊卡(Card)服务、预约(Appointment)服务,以及医生(Doctor)服务。
我们把以上三个服务统称为业务服务。纵观整个 SpringAppointment 系统,除了这三个业务微服务之外,还有一批非业务性的基础设施类服务,具体包括:注册中心服务(Eureka)、配置中心服务(Spring Cloud Config),以及 API 网关服务(Zuul)。关于 Spring Cloud 中基础设施类服务的构建过程不是本专栏的重点,你可以参考拉勾上[《Spring Cloud 原理与实战》]专栏做详细了解。
虽然案例中的各个服务在物理上都是独立的,但就整个系统而言,需要各服务相互协作构成一个完整的微服务系统。也就是说,服务运行时存在一定的依赖性。我们结合系统架构对 SpringAppointment 的运行方式进行梳理,梳理的基本方法就是按照服务列表构建独立服务,并基于注册中心来管理它们之间的依赖关系,如下图所示:
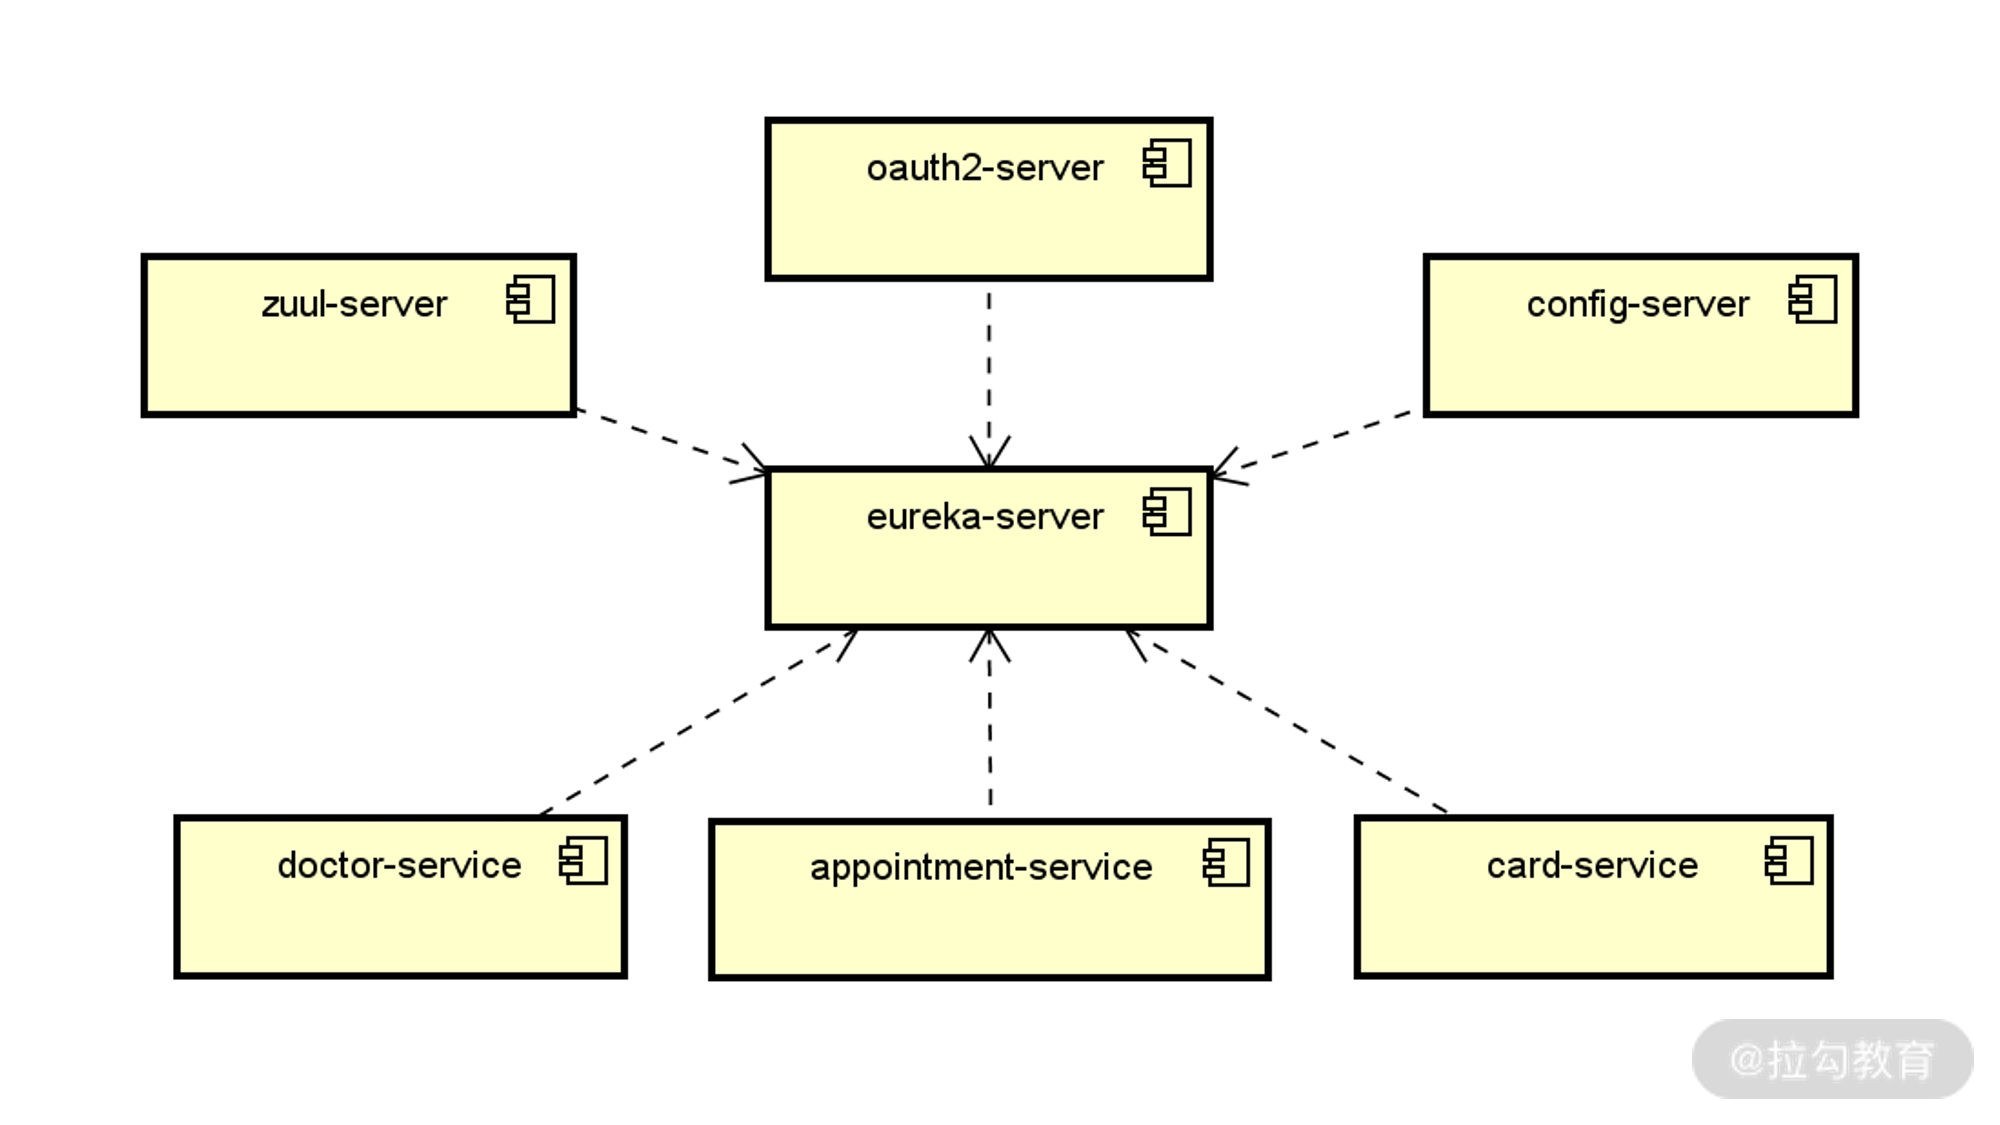
基于注册中心的服务运行时依赖关系图
构建 OAuth2 授权服务
在上图中,我们注意到还存在着案例系统中的最后一个基础设施类微服务,即 OAuth2 授权服务,在这里充当着授权中心的作用。关于 OAuth2 授权服务的具体构建步骤已经在[《授权体系:如何在微服务架构中集成OAuth2协议?》]做了详细介绍,这里我们直接创建 WebSecurityConfigurerAdapter 的子类 WebSecurityConfigurer
以及 AuthorizationServerConfigurerAdapter 的子类 JWTOAuth2Config,实现代码如下所示:
@Configuration

public class WebSecurityConfigurer extends WebSecurityConfigurerAdapter {


    @Override

    @Bean

    public AuthenticationManager authenticationManagerBean() throws Exception {

        return super.authenticationManagerBean();

    }


    @Override

    @Bean

    public UserDetailsService userDetailsServiceBean() throws Exception {

        return super.userDetailsServiceBean();

    }


    @Override

    protected void configure(AuthenticationManagerBuilder builder) throws Exception {

     builder.inMemoryAuthentication().withUser("user").password("{noop}password1").roles("USER").and()

                 .withUser("admin").password("{noop}password2").roles("USER", "ADMIN");

    }

}


@Configuration

public class JWTOAuth2Config extends AuthorizationServerConfigurerAdapter {


    @Autowired

    private AuthenticationManager authenticationManager;


    @Autowired

    private UserDetailsService userDetailsService;


    @Override

    public void configure(AuthorizationServerEndpointsConfigurer endpoints) throws Exception {

     endpoints.authenticationManager(authenticationManager).userDetailsService(userDetailsService);

    }


    @Override

    public void configure(ClientDetailsServiceConfigurer clients) throws Exception {


     clients.inMemory().withClient("appointment_client").secret("{noop}appointment_secret")

                 .authorizedGrantTypes("refresh_token", "password", "client_credentials")

                 .scopes("webclient", "mobileclient");

    }

}
初始化业务服务
在 SpringAppointment 案例系统中,我们需要构建三个业务微服务,即 card-service、appointment-service 和 doctor-service,它们都是独立的 Spring Boot 应用程序。在构建业务服务时,我们首先需要完成它们与基础设施类服务集成。因为 API 网关起到的是服务路由作用,所以对于各个业务服务而言是透明的,而其他的注册中心、配置中心和授权中心都需要每个业务服务完成与它们之间的集成。
集成注册中心
对于注册中心 Eureka 而言,card-service、appointment-service 和 doctor-service 都是它的客户端,所以需要 spring-cloud-starter-netflix-eureka-client 的依赖,如下所示。
<dependency>

    <groupId>org.springframework.cloud</groupId>

    <artifactId>spring-cloud-starter-netflix-eureka-client</artifactId>

</dependency>
然后,我们以 appointment-service 为例,来看它的 Bootstrap 类,如下所示:
@SpringBootApplication

@EnableEurekaClient

public class AppointmentApplication {

	public static void main(String[] args) {


        SpringApplication.run(AppointmentApplication.class, args);

    }

}
这里引入了一个新的注解 @EnableEurekaClient,该注解用于表明当前服务就是一个 Eureka 客户端,这样该服务就可以自动注册到 Eureka 服务器。当然,我们也可以直接使用统一的 @SpringCloudApplication 注解来实现 @SpringBootApplication 和 @EnableEurekaClient这两个注解整合在一起的效果。
接下来就是最重要的配置工作,appointment-service 中的配置内容如下所示:
spring:

  application:

	name: appointmentservice

server:

  port: 8081


eureka:

  client:

    registerWithEureka: true

    fetchRegistry: true

    serviceUrl:

	  defaultZone: http://localhost:8761/eureka/
显然,这里包含两段配置内容。其中,第一段配置指定了服务的名称和运行时端口。在上面的示例中 appointment-service 的名称通过“spring.application.name=appointmentservice”进行指定,也就是说 appointment-service 在注册中心中的名称为 appointmentservice。在后续的示例中,我们会使用这一名称获取 appointment-service 在 Eureka 中的各种注册信息。
集成配置中心
要想获取配置服务器中的配置信息,我们首先需要初始化客户端,也就是在将各个业务微服务与 Spring Cloud Config 服务器端进行集成。初始化客户端的第一步是引入 Spring Cloud Config 的客户端组件 spring-cloud-config-client,如下所示。
<dependency>

    <groupId>org.springframework.cloud</groupId>

    <artifactId>spring-cloud-config-client</artifactId>

</dependency>
然后我们需要在配置文件 application.yml 中配置服务器的访问地址,如下所示:
spring:

  cloud:

    config:

	   enabled: true

	   uri: http://localhost:8888
以上配置信息中,我们指定了配置服务器所在的地址,也就是上面的 uri:http://localhost:8888。
一旦我们引入了 Spring Cloud Config 的客户端组件,相当于在各个微服务中自动集成了访问配置服务器中 HTTP 端点的功能。也就是说,访问配置服务器的过程对于各个微服务而言是透明的,即微服务不需要考虑如何从远程服务器获取配置信息,而只需要考虑如何在 Spring Boot 应用程序中使用这些配置信息。而对于常见的关系型数据访问配置而言,Spring 已经帮助我们内置了整合过程,我们要做的就是引入相关的依赖组件而已。
我们以 appointment-service 为例来演示数据库访问功能,案例中使用的是 JPA 和 MySQL,因此需要在服务中引入相关的依赖,如下所示:
<dependency>

	   <groupId>org.springframework.boot</groupId>

	   <artifactId>spring-boot-starter-data-jpa</artifactId>

</dependency>


<dependency>

	   <groupId>mysql</groupId>

	   <artifactId>mysql-connector-java</artifactId>

</dependency>
现在,我们就可以使用 JPA 提供的数据访问功能来访问 MySQL 数据库了。
集成授权中心
在业务服务中集成授权中心的实现方法,我们已经在[《14.资源保护:如何使用OAuth2协议实现对微服务访问进行授权?》]中做了详细介绍,这里做一些简单的回顾。首先,我们需要在 Spring Boot 的启动类上添加 @EnableResourceServer 注解:
@SpringCloudApplication

@EnableResourceServer

public class AppointmentApplication {


    public static void main(String[] args) {

        SpringApplication.run(AppointmentApplication.class, args);

    }

}
然后,我们需要在配置文件中指定授权中心服务的地址:
security:

  oauth2:

    resource:

	  userInfoUri: http://localhost:8080/userinfo
最后,要做的就是在每个业务服务中嵌入访问授权控制。我们可以使用用户层级的权限访问控制、用户+角色层级的权限访问控制,以及用户+角色+操作层级的权限访问控制这三种策略中的任意一种来实现这一目标。
集成和扩展 JWT
让我们再次回到 SpringAppointment 案例系统,以用户下单这一业务场景为例,就涉及 appointment-service 同时调用 doctor-service 和 card-service,这三个服务之间的交互方式如下图所示:
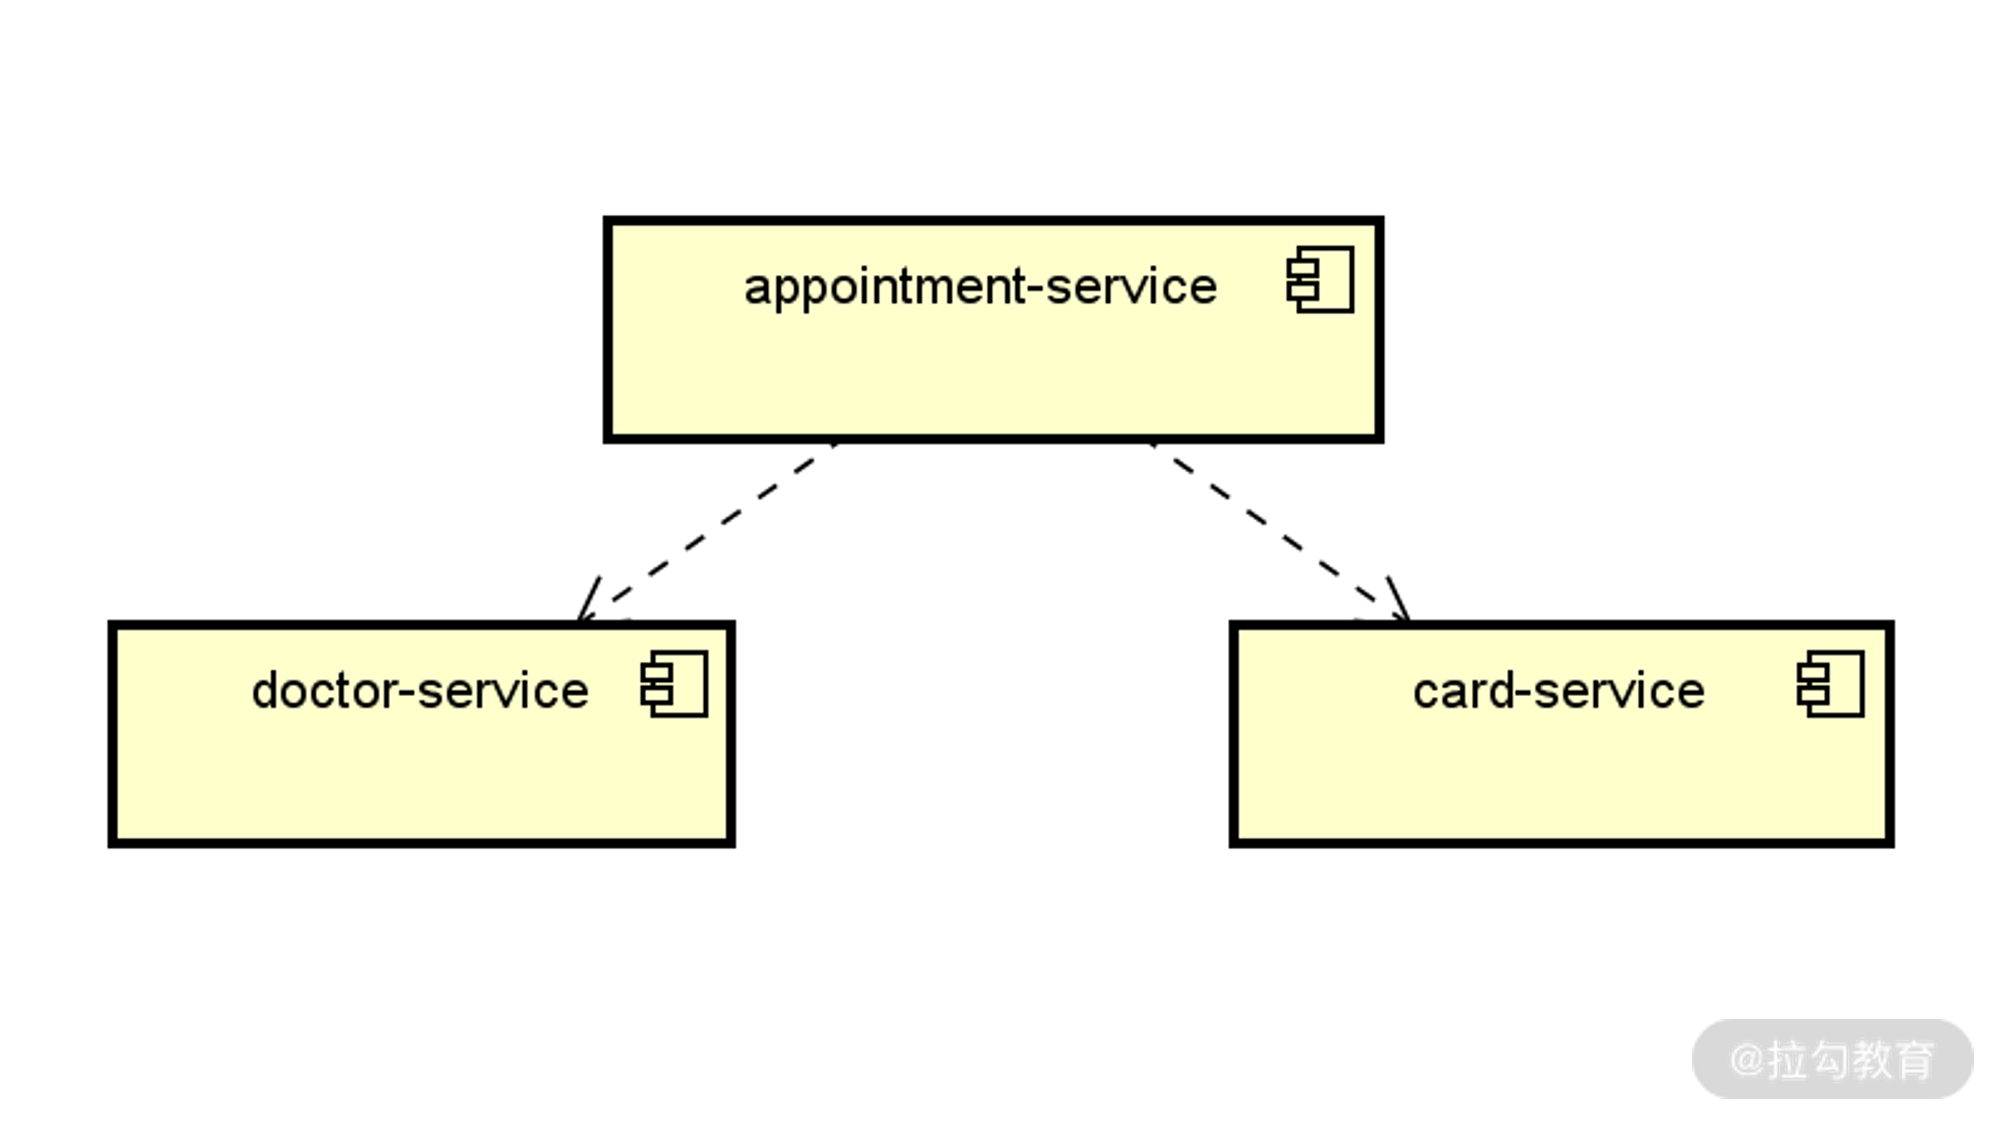
SpringAppointment 案例系统中三个业务微服务的交互方式图
通过这个交互图,实际上我们已经可以梳理出这一场景下的代码结构了,如下所示:
public Appointment generateAppointment(String doctorName, String cardCode) {


        Appointment appointment = new Appointment();


        //获取远程 Card 信息

        CardMapper card = getCard(cardCode);

        …

        //获取远程 Doctor 信息

        DoctorMapper doctor = getDoctor(doctorName);

        …

        appointmentRepository.save(appointment);


        return appointment;

}
其中 appointment-service 从 card-service 获取 Card 对象,以及从 doctor-service 中获取 Doctor 对象,这两个步骤都会涉及远程 Web 服务的访问。因此,我们首先需要分别在 card-service 和 doctor-service 服务中创建对应的 HTTP 端点。这一过程不是课程的重点,如果你感兴趣,可以参考案例源码自己进行学习:https://github.com/lagouEdAnna/SpringSecurity-jianxiang/tree/main/SpringAppointment。
集成 JWT
在《15 | 令牌扩展:如何使用JWT实现定制化 Token?》中,我们引入了 JWT 并完成了与 OAuth2 协议的集成,从而实现了定制化的 Token。JWT 同样也需要在整个服务调用链路中进行传递。而持有 JWT 的客户端访问 appointment-service 提供的 HTTP 端点进行下单操作,该服务会验证所传入 JWT 的有效性。然后,appointment-service 会再通过网关访问 card-service 和 doctor-service,同样这两个服务也会分别对所传入的 JWT 进行验证,并返回相应的结果。
现在,让我们在 appointment-service 中构建一个 CardRestTemplateClient 类,会发现它使用了在《15 | 令牌扩展:如何使用 JWT 实现定制化 Token?》中所创建的 RestTemplate 对象来发起远程调用,代码如下所示:
@Service

public class CardRestTemplateClient {


    @Autowired

    RestTemplate restTemplate;


    public CardMapper getCardByCardCode(String cardCode) {

        ResponseEntity<CardMapper> result =

                restTemplate.exchange("http://cardservice/cards/{cardCode}", HttpMethod.GET, null,

                        CardMapper.class, cardCode);


        return result.getBody();

    }

}
我们知道在这个 RestTemplate 中,基于 AuthorizationHeaderInterceptor 对请求进行了拦截,从而完成了 JWT 在各个服务中的正确传播。
最后,我们通过 Postman 来验证以上流程的正确性。通过访问 Zuul 中配置的 appointment-service 端点,并传入角色为“ADMIN”的用户对应的 Token 信息,可以看到订单记录已经被成功创建。你可以尝试通过生成不同的 Token 来执行这一流程,并验证授权效果。
扩展 JWT
在案例的最后,我们来讨论一下如何扩展 JWT。JWT 具有良好的可扩展性,开发人员可以根据需要在 JWT Token 中添加自己想要添加的各种附加信息。
针对 JWT 的扩展性场景,Spring Security 专门提供了一个 TokenEnhancer 接口来对 Token 进行增强(Enhance),该接口定义如下:
public interface TokenEnhancer {

    OAuth2AccessToken enhance(OAuth2AccessToken accessToken, OAuth2Authentication authentication);

}
可以看到这里处理的是一个 OAuth2AccessToken 接口,而该接口有一个默认的实现类 DefaultOAuth2AccessToken。我们可以通过该实现类的 setAdditionalInformation 方法,以键值对的方式将附加信息添加到 OAuth2AccessToken 中,示例代码如下所示:
public class JWTTokenEnhancer implements TokenEnhancer {


    @Override

    public OAuth2AccessToken enhance(OAuth2AccessToken accessToken, OAuth2Authentication authentication) {

        Map<String, Object> systemInfo = new HashMap<>();

        systemInfo.put("system", "Appointment System");


        ((DefaultOAuth2AccessToken) accessToken).setAdditionalInformation(systemInfo);

        return accessToken;

    }

}
这里我们以硬编码的方式添加了一个“system”属性,你也可以根据需要进行相应的调整。
要想使得上述 JWTTokenEnhancer 类能够生效,我们需要对 JWTOAuth2Config 类中的 configure 方法进行重新配置,并将 JWTTokenEnhancer 嵌入到 TokenEnhancerChain 中,如下所示:
@Override

public void configure(AuthorizationServerEndpointsConfigurer endpoints) throws Exception {

        TokenEnhancerChain tokenEnhancerChain = new TokenEnhancerChain();

        tokenEnhancerChain.setTokenEnhancers(Arrays.asList(jwtTokenEnhancer, jwtAccessTokenConverter));


        endpoints.tokenStore(tokenStore)

                .accessTokenConverter(jwtAccessTokenConverter)

                .tokenEnhancer(tokenEnhancerChain)

                .authenticationManager(authenticationManager)

                .userDetailsService(userDetailsService);

}
请注意,我们在这里通过创建一个 TokenEnhancer 的列表将包括 JWTTokenEnhancer 在内的多个 TokenEnhancer 嵌入到 TokenEnhancerChain 中。
现在,我们已经扩展了 JWT Token。那么,如何从这个 JWT Token 中获取所扩展的属性呢?方法也比较简单和固定,如下所示:
//获取 JWTToken

RequestContext ctx = RequestContext.getCurrentContext();

String authorizationHeader = ctx.getRequest().getHeader(AUTHORIZATION_HEADER);

String jwtToken = authorizationHeader.replace("Bearer ","");

//解析 JWTToken

String[] split_string = jwtToken.split("\\.");

String base64EncodedBody = split_string[1];

Base64 base64Url = new Base64(true);

String body = new String(base64Url.decode(base64EncodedBody));

JSONObject jsonObj = new JSONObject(body);

//获取定制化属性值

String systemName = jsonObj.getString("system");
我们可以把这段代码嵌入到需要使用到自定义“system”属性的任何场景中。
小结与预告
案例分析是掌握一个框架应用方式的最好方法,对于 OAuth2 协议也是一样。本讲中,我们将 Spring Security 结合 Spring Cloud 构建了一个微服务案例系统 SpringAppointment。然后根据 SpringAppointment 案例中的业务场景划分了各个微服务,并重点介绍了各个业务服务的构建过程。我们一方面展示了业务服务与基础设施服务的集成过程,另一方面也演示了如何集成和扩展 JWT 的实现过程。
最后再给你留一道思考题:在业务系统中如何实现对 JWT 进行定制化的扩展呢?欢迎在留言区和我分享你的收获。
© 2019 - 2023 Liangliang Lee. Powered by gin and hexo-theme-book.